Wednesday, November 4, 2009

Brooke & Ryan Engagement (51 photos), by Brooke Brehm


I'd like to share my Snapfish photos with you. Once you have checked out my photos you can order prints and upload your own photos to share.
Click here to view photos

All photos are courtesy of Brian Lusby Photography. (Thanks Brian!)

Friday, September 4, 2009

Phew, We Have Somewhere to Sit


I really wanted to incorporate Mr. Riley and my Alma Mater into our wedding. It has played such an important role in our lives: the majority of our wedding party and family went to school there, it is where we met, and where we got engaged. So, in tribute, we have named our tables after places at James Madison University that are important to us and/or our guests

Here they all are...

The Sweatheart Table
When JMU was an all girl school the Kissing Rock was the farthest point boys were allowed to come onto campus. On any given night, you could see couples sharing a goodnight kiss at the rock. It is rumored that couples that share a kiss at the kissing rock will be together forever.
Memorial Hall: ROTC Headquarters
The Bookstore: A Staple (haha)
Bridgeforth Stadium: Because the World Revolves Around Football

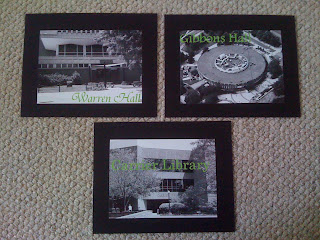
Warren Hall: The Student Union
Gibbons Hall: AKA D-hall (where many a good meals were had)
Carrier Library: Study time
Harrison Hall: For the S-COM Majors
Gifford Hall: Ryan's Freshman Year Dorm
Coverse Hall: Residence Hall on the Quad

Miller Hall: Home of the Chemisty Dept for a while
Burruss Hall: Home of the Biology Dept
Wilson Hall: Center of Campus


Eagle Hall: Tallest Building on Campus; Freshman Dorm
Showker Hall: For all the Business Majors
Godwin Hall: Lots of GenEd Classes Held Here

The Festival: Home to lots of Sunday Evening Meals
Potomac Hall: Just about Everyone has Lived Here
ISAT: For the ISAT Major

*Unless otherwise noted all pictures above are courtesy of me*

I created these table names by finding pictures of the buildings online. I then cropped and recolored all the pictures and layered varying fonts over the pictures in the same green color we are using throughout the wedding. I then printed the pictures as 5x7 at Walmart. I then cut black cardstock so I would have a 1.5" border around the picture are adhere the photos to the cardstock with double stick tape. This project was super easy, very quick, and pretty inexpensive. I may print a second copy of all the pictures to adhere to the other side so people can see their table name from multiple directions but haven't yet decided.
So JMUers what do you think? What table would you like to sit at?

A tisket, a tasket, a green, black, and white basket...

The other day I was in the local dollar store hunting for materials for another DIY project (more to come later) when I found these black and white woven baskets.


Immediately, I thought that they would be perfect to hold the programs at the wedding but they weren't quite there. So, I decided to swap out the middle black and white weave (nylon-ish fabric) with some green ribbon that I had purchased previously. I just cut the weave, which thankfully was not glued, and began to unweave it.

Finally, I just wove in some green ribbon, tied it off on the inside, and viola... done! I might add a bow or little sign to front as we get closer but they''re complete, for now.

Saturday, August 15, 2009

Three Times a Charm: Bridesmaid Dress Update

The girls originally picked two J.Crew dresses to wear. But they have since decided to wear three different dresses (mainly due an awesome sale J. Crew was having) and because their new picks are super cute! So, without further ado, the bridesmaid dresses....
This dress was actually one of the original two. It is the Delores (Style 98979) and will be worn by two of the bridesmaids. "A dramatic and unexpected crisscross of fabric at the neckline makes this midweight silk taffeta dress completely alluring and appropriate for any occasion. Sleeveless silhouette. Fitted bodice, A-line skirt. V-neck at front and back." -J. Crew
This dress is the Strapless Sangle (Style 11409) and will be worn by three of the bridesmaids. "In midweight silk taffeta, this full, feminine strapless dress has a fitted bodice cinched with a knot at the center and an A-line skirt with box pleats for extra body. On-seam pockets." - J. Crew

The third dress will be worn by the other two bridesmaids and is the Halter version of the Sangle dress (Style 11420). "A fresh look at the halter, in midweight silk taffeta. This full, feminine dress has a fitted bodice cinched with a knot and an A-line skirt with box pleats for extra body. Sleeveless silhouette. Straps originate at knot detail on straight neckline. On-seam pockets." -J. Crew

Sunday, August 9, 2009

The Ceremony Site

After a lot of looking around, mainly by Mr. Riley and his Mom, we decided that we would get married at my church in Fredericksburg, VA. We both liked the idea of following tradition but I also love my pastor and the history behind the church's sanctuary.

" [The] current sanctuary, the second one to be used by Presbyterians in the city, is an example of Jeffersonian Reformed Revival Architecture, and it is Fredericksburg's oldest house of worship. During the Battle of Fredericksburg in December of 1862, the church was heavily shelled, and in 1864, the interior was sacked and the roof partially destroyed. Clara Barton, founder of the American Red Cross, cared for wounded Union soldeirs in the church." -From The Fredericksburg PC Website

If you look closely at the picture below you can see one of the cannon balls from the Battle of Fredericksburg referenced above. (It's the black spot on the second column above the light fixture).

Although the church does not have a traditional steeple the bell tower is a prominent figure in city skyline.
The wrought iron gate entrance mirrors the entrance to our reception site, The Jepson Executive Alumni Center.

Below is a picture of the sanctuary. It was recently redone with new carpet installed, new paint, and all the wood trim and embellishments restored.


Another, better picture of the sanctuary. The pews are traditional box pews. During the battle of Fredericksburg the church was utilized as a field hospital. The original box pews were removed to construct coffins for deceased soldiers. The pews now used are replicas.

Thursday, August 6, 2009

The Reception Hall

Although no one is Alumni we decided to host our reception at the University of Mary Washington's Jepson Executive Alumni Center in downtown Fredericksburg, VA.

These large bronze gates flank the brick courtyard enterance to the Jepson and always stand ajar. The Jepson was only dedicated in 2004 but these gates were created in Paris in 1904, stood at a mansion in New York City until 1954, were then donated to the University and kept in storage, and were finally rescued and restored to frame the entrance of the Jepson Center.


A panoramic view of the courtyard. The building to the left houses the Rector's Gallery and the Rappahannock Grand Ballroom. The center building, well, I'm really not sure what is in the center building, I believe offices and the Board Room. The right building is the Kalnen Inn which contains three bedroom suites, a sitting room, a parlor, and a salon.

This is the Friendship Fountain that is right outside the Kalnen Inn it also looks out onto one of the largest and most popular sledding hills in Fredericksburg. :)


This is the actual ballroom. Although it is hard to tell from the picture this room is HUGE!


Source
Although this room is only serving as a second bar and entry area it is my absolute FAVORITE! How much do you LOVE LOVE LOVE those light fixtures? Well I do. I can't wait to see this room decorated for the wedding!
Another shot of the Mayo Courtyard that is the center of the Jepson Executive Alumni Center.

Invitation Update

Mr. Riley and I got to talking a while ago and decided the menus at every plate was going to be overkill. The meal is plated with a duel entree served so there are no options for guests to choose but we still wanted everyone to see what they were eating. We decided to return our original invitations from Target just because they didn't match the rest of the stationary suite and use what we originally intended to use as menus as our new invitation option. We also saved a little money, which is always good! :)

DIY Card Box

I started off with a plain heavy cardboard round hat box. I then spray painted the entire top of the box and the inside of the bottom of the box with flat black paint. This took approximately two to three light coats and because I had fast drying spray paint took about 2 hours to completely set up.
I order one yard of fabric that matched the fabric of our custom table runners, table squares, and ring bearers pillows (Michael Miller; Dandy Damask in Black). I then dug out my handy dandy hot glue gun, a little stitch witchery, a ruler, and a marking pencil (all things I keep around due to my random crafting urges).
I just measured the height and circumference of the bottom piece of the hat box and cut a piece of fabric to accomodate. I left myself about 2 inches of extra fabric on all sides but you could definitely get away with just an inch. Then I used my stitch witchery to create a hem on all sides, leaving a nice creased finished edge all the way around (sorry for the blurry picture).
I then started at one end and hot glued a thin bead between the fabric and the hat box. I noticed my fabric was exactly the right size (about 3/16" too tall) so I was careful to keep the fabric even across the bottom edge, so the box would still sit evenly. Finally I made a pretty bow out of some white satin ribbon with my Bowdabra (I told you I was a craft junky) and hot glued that centered on the top of the hat box. Viola! Super easy lemon peasy... took approximately 30 min after spray painting.
I still have not decided if I am going to cut a hole somewhere in the box for guests to slip their cards into or just set the top off to the side... What do you think?

Thursday, July 30, 2009

Our Photographer

After looking at a TON of photographers online, Mr. Riley and I narrowed it down to about ten that were located in a two hour radius of the wedding location and that we could afford. After that I started calling around, of the ten, three were available for our day. The first appointment I made was to meet Brian Lusby of Brian Lusby Photography.

My mom and I drove two hours to meet him at his studio, which is out of his home. After almost two hours of gabbing about everything I was in love.... not with Brian, although he is pretty handsome, but with his amazing photographs. He got me, got my ideas, and focuses on the format that both Mr. Riley and I enjoy, photojournalistic. I hate looking through a wedding album and seeing tons of the same pictures you saw in the last wedding album you looked at... the bride and groom under the brides veil, the bride seated looking up serenely, the groomsmen all holding the bride up on her side, etc.... I wanted REAL photos. Someone to truly capture the moment. Not someone to pose us all to look like we are having the moments you are "supposed" to have on your wedding day. I wanted to see those things people secretly do when they think no one is looking.... like the ring bearer asleep on the pew because it was past his nap time, the groomsmen goofing off while getting ready, the anticipation and angst and joy in our parents face. All of it.

But I couldn't very well book Brian right then, I hadn't even looked at the others. After a few weeks of procrastination I set up an appointment with one of the other available photographers. I went to their studio and although they were very nice we just didn't click. All of their photography examples were very outdated and pretty posed. Plus their prices were OUTRAGEOUS, like triple everyone else we had looked at.

Once I left that appointment I just knew. Before I even got to my car I was dialing Brian to get a contract and deposit in the mail and I couldn't be happier with our decision (well mine... sorry Mr. Riley) even though I didn't even get to the third photographer.

It did help that Brian shot Chris Cooley's wedding (TE for the Washington Redskins) and Mr. Riley and I are HUGE Redskins fans. So I'm sure there will be a ton of questions for Brian in regards to Chris and probably a rousing rendition of "Hail to the Redskins". So for those of you who don't know the words, start learning...

"Hail to the Redskins!
Hail Victory!
Braves on the Warpath!
Fight for old D.C.!
Run or pass and score -- we want a lot more!
Beat 'em, Swamp 'em,
Touchdown! -- Let the points soar!
Fight on, fight on 'Til you have won
Sons of Wash-ing-ton. Rah!, Rah!, Rah!
Hail to the Redskins!
Hail Victory!
Braves on the Warpath!
Fight for old D.C.!

Monday, July 27, 2009

Floral Inspirations

I was having a really hard time finding green flowers, number one and BRIGHT green flowers number two. I eventually found these great inspiration photos that I shared with my florist.


I love the simple and clean look of the Bells of Ireland flanking this ceremony. They're no fuss but still interesting and draw your eye. We will be incorporating some Bells of Ireland into our ceremony arrangements but we will have centerpiece very similar to this used at our reception site for the place cards.


The Bells of Ireland centerpiece will replace this busier centerpiece at our reception. The place cards will just be lined up around the centerpiece on the table (not in wheat grass displays) and black framed copies of our menu will go in the spaces between the groups of place cards.

I have also discovered through this process that I LOVE LOVE LOVE MUMS, every single variety, button mums, spider mums, football mums, ALL OF THEM!! The bridesmaids will be carrying bouquets similar to this one. I will also carry a bouquet similar to this one expect mine will be slightly larger and have more white varieties of mums/roses instead of green.

Here I go again with the mums... they're so freakin' cute! I don't think flower petals would stand a chance against our two adorable but precocious flower girls so I decided on pomanders. They're cute and easy... all they have to focus on is walking up the isle. Although, I'm sure these will become weapons of mass destruction sometime in the night (probably against the ring bearers)! :)

Our table arrangements will look something like this but will be mini green hydrangeas with some white roses in it. The bases will be of similar porportion but black (these look grey to me).


The gentlemen will be wearing simple green dendrobium orchids like these possibly with some hypericum berries mixed in.

Friday, July 24, 2009

Gift Bags


My mom and I found these great reusable grocery bags at A.C. Moore last weekend. They were only $4 (for the pair) and best of all they're "green"! We will be using these for the bridal party gifts and the out of town (OOT) bags to go in the hotel rooms.

Unity Candle Base

I have not been impressed by ANY of the unity candles I have seen in the stores. They are a little too "busy" for my tastes... too many sparkles, pearls, etc. So I decided I was going to make my own. It is pretty easy and will show you how mine turns out in a later post.


In addition to not being happy with the candles I was REALLY not happy with any of the bases. I wanted to use a "traditional" base that held two taper candles with a large pillar candle in the center but I also wanted it to be black to make the candles "pop" and tie in that color. Those two things are no where to be found. So I decided to make my own. I ended up using three pillar candles, two shorter ones and one taller one instead of taper candles.


I found these bases in the Halloween section at Michael's.... haha.


The little purple skull heads had to go... but that was pretty easy with a pair of pliers. I touched up the marks left by the my yanking the skull heads out with a little bit of black spray paint and VOILA....

a whole new purpose... and theme!

Sunday, July 19, 2009

Bridesmaid Dresses

I basically gave the bridesmaids free reign on the dresses (I did pick out the fabric) and this is what they came up with (Did I mention I couldn't be more excited? I think I'm going to buy one too, just to have!)....


The dresses are both from J.Crew, are silk tafetta, and will be worn in black. Five of the ladies will be wearing the top dress (Lorelei- item 11922) and two of the ladies will be wearing the bottom dress (Delores- item 98979).

Wedding Favors

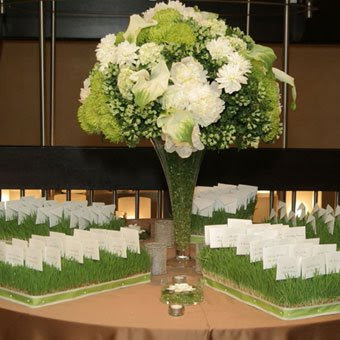
These stunning votives are Kate Aspen creations that I am OBSESSED with. We will be using these as favors for all of our guests!

Wedding Stationary

I just wanted to share with everyone some of the great buys I purchased at Michael's over the weekend. I will repost with mock-ups once we get closer to the big day but I couldn't help sharing all the great damask products out there.


These were originally supposed to be invitations but we will be using these DIY invitations as our menus at the reception. These were $39.99 for 40 count. This is a little pricey but Michael's always has coupons.
These placecards are a little hard to see but they are white with a little damask border along the left side. These are also DIY from Michael's and cost only $6.99 for 40 count. I think we will add a green bow along the crease of these placecards to jazz them up a little.

These will be the wedding programs. They are simply a black cardstock with layers of white cardstock and finished off with a little bow. They come with white bows but I think we will use our green ribbon to tie in that aspect of our color scheme. These programs came in at $39.99 for 40 count as well.