PS. Look how happy he is. :)
Showing posts with label Invitations. Show all posts
Saturday, March 13, 2010
DIY Invitations Part V: What's on the Outside Matters Too
When it came to the outer envelopes we felt it was important to have them all hand addressed. A calligrapher was not in the budget so we had to come up with a way to improvise. While browsing Wedding Bee I came across Mrs. Labrador's post about fauxligraphy...and thought I can do that!
Some Fauxligraphy Tips:
1. This works best on non-white envelopes. For some reason, no matter what marker/pen I used on the white envelopes the ink soaked in around printed text and was evident that I traced.
2. Textured paper makes tracing soooo much harder! Try to avoid having to trace on textured paper it made my pen strokes look all the more sloppy.
3. Test out your writing apparatus A LOT. I can say this enough: practice, practice, practice. Practice writing each letter, practice using the marker/pen it really made a difference in the quality of my work.
I pulled up every calligraphy font I could find on my computer and on dafont and started practicing. The Mr. even tried his hand at some practice tracing but it wasn't a pretty sight. ;) We eventually settled on the same font Mrs. Labrador used.
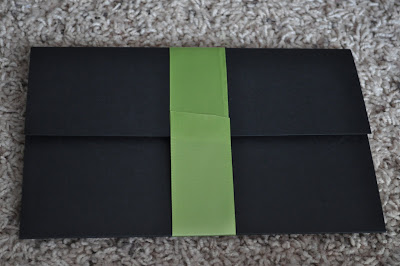
After some trial and error (trying every color in the rainbow) I found the best way to print on the black envelopes and still see the print was to use LIME GREEN text. It was really faint but you could make it out.
Then me and my silver sharpie (regular tip) went to town....

I wrote our return address on the back flap in my regular handwriting and then we finished the envelopes off with the King and Queen of Hearts stamps.
We ended up doing inner envelopes as well (these came with our invitation suite from Michael's) but just printed everyone's names in the Renaissance font instead of handwriting them. What can I say my hand was pooped after the outer envelopes.
Black envelopes (6x9 Booklet Style) from Envelope Mall: 200 for $30
Some Fauxligraphy Tips:
1. This works best on non-white envelopes. For some reason, no matter what marker/pen I used on the white envelopes the ink soaked in around printed text and was evident that I traced.
2. Textured paper makes tracing soooo much harder! Try to avoid having to trace on textured paper it made my pen strokes look all the more sloppy.
3. Test out your writing apparatus A LOT. I can say this enough: practice, practice, practice. Practice writing each letter, practice using the marker/pen it really made a difference in the quality of my work.
I pulled up every calligraphy font I could find on my computer and on dafont and started practicing. The Mr. even tried his hand at some practice tracing but it wasn't a pretty sight. ;) We eventually settled on the same font Mrs. Labrador used.
After some trial and error (trying every color in the rainbow) I found the best way to print on the black envelopes and still see the print was to use LIME GREEN text. It was really faint but you could make it out.
Then me and my silver sharpie (regular tip) went to town....

I wrote our return address on the back flap in my regular handwriting and then we finished the envelopes off with the King and Queen of Hearts stamps.
We ended up doing inner envelopes as well (these came with our invitation suite from Michael's) but just printed everyone's names in the Renaissance font instead of handwriting them. What can I say my hand was pooped after the outer envelopes.
Black envelopes (6x9 Booklet Style) from Envelope Mall: 200 for $30
Silver Sharpies (4pk): $5
King and Queen of Hearts stamps: $88
Total cost per invitation: $1.03
Grand total for entire invitation: $3.37
Up next: Mailing these puppies out! :)
Friday, March 5, 2010
DIY Invitations Part IV: Suck It In...
...the belly band edition.
.JPG)

.JPG)

Cost:
-Offrey Ribbon (1.5" x 12') $2 per roll (used 9 rolls)
-Double Stick Tape: Already had (FREE)
-Mounting Tape: Already had (FREE)
-Cardstock for Monogram: Already had (FREE)
Total cost for invitations (made 120): $18
Total per invitation: $0.15
Grand total per invitation-to-date (belly bands, invitations, pocketfolds, envelope liners) : $2.34
Up next: Outer Envelopes and Mailing!!
Belly bands (n): Decorative emblishment usually used for paper products whose purpose is to hold many items together or closed.
When we last left off our invitations were nicely secured in our pocketfold but our pocketfold was flapping in the wind. What did we do to fix it?
I started by wrapping 1.5 inch wide ribbon around the pocketfold and securing the ends to each other with double stick tape. Don't worry it doesn't have to look perfect you are just going to cover it up.
Next I added a small piece of 3M Mounting Tape on top of the ribbon. This was just to give the invitations a little more dimension. You could easily just use double stick tape here as well.
Finally, I adhered the monogram that I developed in Publisher to the top. The Mr. painstakingly trimmed the scraps from our pocketfolds projects to 2" x 2" squares then adhered our monogram cut into 1.5" x 1.5" squares on top with double stick tape.
Cost:
-Offrey Ribbon (1.5" x 12') $2 per roll (used 9 rolls)
-Double Stick Tape: Already had (FREE)
-Mounting Tape: Already had (FREE)
-Cardstock for Monogram: Already had (FREE)
Total cost for invitations (made 120): $18
Total per invitation: $0.15
Grand total per invitation-to-date (belly bands, invitations, pocketfolds, envelope liners) : $2.34
Up next: Outer Envelopes and Mailing!!
Friday, February 26, 2010
DIY Invitations Part III: Love/Hate Relationship with a Printer
IF YOU ARE A GUEST TURN AWAY NOW
UNLESS YOU WANT TO SEE OUR SUPER AWESOME WEDDING INVITATIONS BEFORE YOU GET THEM IN THE MAIL!
Alright, for all you suprise-spoilers here is our completely printed wedding invitation suite.

Printing these babies at home saved us a lot of moolah but took FOREVER and A YEAR. I kid you not, we spent the better part of two weekends hand feeding paper into our over-worked printer and we're still not quite finished with some of the inner envelopes.
How did we do it? We stalked a few wedding invitation websites and picked out a few layouts/font combinations that we liked and then played around in Microsoft Word and Microsoft Publisher until we came up with a design we both could agree on. We then nitpicked the wording for a few more days, double and triple checked spelling, and then printed out a few dozen samples on regular computer paper.
Tip #1: Play around with your printers settings. Usually there is an advanced tab that is accessible from the print window. We ended up using an HP matte premium paper setting because there was no cardstock options, set our print quality to best, and custom set our printer paper size to fit each component of our invitation suite.


Tip #3: Wait your turn. I tried putting stacks and stacks of the card stock in the printer but inevitably the print would misfeed or grab too many and a few pieces would be ruined. To avoid this we hand-fed each piece of cardstock into the printer which took a really long time but proved to be less wasteful.
Time: Approximately 10-12 hours each day for about 4 days. Capitalize on your down time during this project (ie. when things are printing) and start assembling, applying stamps to envelopes, or any other quick project you can do.
Difficulty level: Medium. I consider myself pretty computer savvy but a few times at was at a loss for words as to why things just weren't printing correctly. My only advise is to keep messing around with it and eventually it will work.
Cost:
-Michael's BRIDE's Invitation Set included invitations, outer envelopes, large response cards (used for details insert), and response envelopes (didn't use): $40 for 40 (purchased with 40% off coupons)= $24
-Michael's BRIDE's all-purpse cards with envelopes: $15 for 40
-Stamps for response envelopes: 1 $0.44 stamp per envelope
-Printer cartridge: We didn't even use a whole cartridge so FREE.
-Test computer paper: Already had lying around so FREE.
Total cost for invitations (made 120): $24 x 3 + $15 x 3 + $0.44 x 120 = $169.80
Total per invitation: $1.42
(Source)

Printing these babies at home saved us a lot of moolah but took FOREVER and A YEAR. I kid you not, we spent the better part of two weekends hand feeding paper into our over-worked printer and we're still not quite finished with some of the inner envelopes.
How did we do it? We stalked a few wedding invitation websites and picked out a few layouts/font combinations that we liked and then played around in Microsoft Word and Microsoft Publisher until we came up with a design we both could agree on. We then nitpicked the wording for a few more days, double and triple checked spelling, and then printed out a few dozen samples on regular computer paper.
Tip #1: Play around with your printers settings. Usually there is an advanced tab that is accessible from the print window. We ended up using an HP matte premium paper setting because there was no cardstock options, set our print quality to best, and custom set our printer paper size to fit each component of our invitation suite.

The invitations were DIY BRIDE'S brand from Michaels so some assembly was required. We printed on the white cardstock, wrapped a piece of black ribbon (included) around the invitation and secured with tape under where the cardstock would lay, finally we attached the cardstock with glue dots (included).
Tip #2: Be patient. Little-miss-grabby-hands here pulled a few paper products off the printer before they had a chance to dry and smeared the ink. Thankfully we had a quite a few extras but it was a easy mistake to avoid.

We included lines that asked when our guests will be arriving and where will they be staying on our response cards to ensure we got everyone's OOT bags to them regardless if they were staying at the hotel we have a room block at or not.

Tip #3: Wait your turn. I tried putting stacks and stacks of the card stock in the printer but inevitably the print would misfeed or grab too many and a few pieces would be ruined. To avoid this we hand-fed each piece of cardstock into the printer which took a really long time but proved to be less wasteful.
Time: Approximately 10-12 hours each day for about 4 days. Capitalize on your down time during this project (ie. when things are printing) and start assembling, applying stamps to envelopes, or any other quick project you can do.
Difficulty level: Medium. I consider myself pretty computer savvy but a few times at was at a loss for words as to why things just weren't printing correctly. My only advise is to keep messing around with it and eventually it will work.
Cost:
-Michael's BRIDE's Invitation Set included invitations, outer envelopes, large response cards (used for details insert), and response envelopes (didn't use): $40 for 40 (purchased with 40% off coupons)= $24
-Michael's BRIDE's all-purpse cards with envelopes: $15 for 40
-Stamps for response envelopes: 1 $0.44 stamp per envelope
-Printer cartridge: We didn't even use a whole cartridge so FREE.
-Test computer paper: Already had lying around so FREE.
Total cost for invitations (made 120): $24 x 3 + $15 x 3 + $0.44 x 120 = $169.80
Total per invitation: $1.42
Grand total per invitation-to-date (invitations, pocketfolds, envelope liners): $2.19
Up next: belly bands, outer envelopes, and mailing them off!!
Monday, February 1, 2010
DIY Invitations Part II: Pocketfolds
...aka how to make a pocketfold using legal sized (8.5 x 14) cardstock for less than $0.50 each!! You hear me $0.50 each?? Ok, well... was forced to be creative due to a little math error (I should have ordered custom paper that was 8.5 x 18, but I was having "bride brain" that day).
Here is what we are working towards:
I staggered the insert panel to show you that it is a double layer but after construction it should lay directly over the pocketfold backing.I will provide the exact measurements I used but obviously they can, and should, be customized to fit your invitation suite.
My invitations: 8.5" x 5.5"
RSVP inserts: 3.25 x 4.75"
Reception and Guest Info insert: 4.25" x 5.5"
POCKET FOLD
1) Determine where you want your folds to be. My folds ended up being at 3" (fold between flap and invitation panel) and 8.6" (fold between invitation panel and insert panel).
2) Score! Score your predetermined fold lines using a scoring blade.
(Scoring the 8.6" fold)
(Scoring the 3" fold)
POCKET MAKING
3) Create pocket panel. Because of my math error I did not have enough paper to to fold a pocket into the "pocket-fold" so I ended up cutting another panel of paper to be glued over top of insert panel. I then cut slits into top panel to create pockets. These panels were cut to 8.5" x 5.5".
4) Adding the pockets. I liked the pockets at 3" and 5" from the top so I marked horizontal guidelines. To create the actual pockets I measured my inserts to see how wide the pockets would need to be to hold the paper snug* but still allow for easy removal and reinsertion. The top pocket was cut to 4.25" wide and the bottom was cut to 3.25" wide. I found the best way to cut the pockets was using a paper cutter vice an Xacto-knife.
5) Attach it. Finally, I glued the pocket panel on to the backing using glue dots.**
THE FINALE
6) Bone fold. Be sure to use a bone folder to really crease all those folds tight. This will be very helpful when it comes time to stuff envelopes.
The final product....
We will be adding belly bands to keep the pocketfolds closed and add a splash of color but more on those to come later.
Time: This took WAY longer than I expected. Working alone I got about a quarter of them done in 8-10 hours. I finally enlisted my fiance and we knocked the rest out in about 6-8 hours.(Note this is for 120 pocketfolds)
Difficulty level: Medium-Hard. Pocketfolds (my way) involve A LOT of measuring and cutting. If you are not skilled with a paper cutter or rush making your measurement they can start looking sloppy.
Cost:
250 sheets of paper= $44.00 (we only used 180 sheets)
Glue= $25 (we went through a TON of glue... literally)
Bone folder (already had)
Paper cutter (already had)
Total per pocketfold: $0.47
Total per invitation-to-date: $0.77 (envelope liners and pocketfolds)
Notes
*I found that if the pockets were too large that the insert would slide down in between the insert panel and pocket panel and you can't get it out!!
** Easier said than done. The placement of the glued panel was one of the hardest parts of this project just because nothing was cut perfect so it took a little fudging to get it all to look good.
Friday, January 15, 2010
DIY Invitations Part I: Envelope Liners
Our store bought invitation kits needed a little personalization before they were sent out. The all white envelopes that accompanied the kit were, how do you say, blah. They were boring, white, sterile, etc. and we wanted them to feel elegant, graphic, bold, fun, and a touch preppy. After searching the internet, crafting stores, and not so crafting stores high and low for the perfect paper I crumpled into a tantrum in the middle of HobbyLobby. My lovely finance casually suggested, "What about these?" (*hands paper to me*) and I was sold.
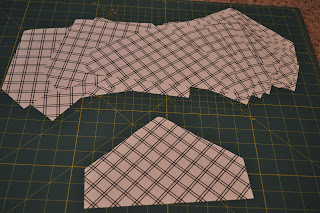
1. To start open your envelope and make a template. This took a couple tries. I used plain computer paper and held everything up to our sliding glass door so I could easily trace the "lick lines" (I'm not so sure that is the technical term for the adhesive bonding on envelopes but that's what I always called it).

2. Create a thicker template from your computer paper draft. I used one of those three tab folders that I had lying around.
3. Trace your template onto the liner paper. I used 12x12 pieces of scrap booking paper and was able to fit three tracings onto each page. My envelopes were 8.75 x 5.75 and came with a BRIDES invitation suite from Michaels.
4. Cut out liners using scissors. Although you could probably use a paper cutter for some of the cuts the majority of this pattern needed to be cut by hand.
5. Use adhesive to attach liners to envelopes. I tried all different adhesives including: Scotch Double Stick tape, hot glue, Scotch Wrinkle-Free Glue Stick, Elmer's School Glue Stick, and Ad tech Dot Glue Runner. Stay tuned for my adhesive review in a later post but the Scotch Wrinkle-Free Glue Stick worked the best for this project.

6. Use bone folder to crease paper. This was somewhat tricky because the paper did not want to fold at the envelope's crease but with a little finesse I was able to crease all the liners.

7. Enjoy all your hard work!!

Time: It took me about one full day to do 120 envelopes including tracing, cutting, and gluing.
Difficulty level: Easy
Cost: Envelopes (part of invitation suite)- Free
Liner paper- $0.59 per page x 40 = $23.60
Bone folder (already had)- $10
Scotch Wrinkle-Free Glue Stick- ~$3.00 for 2 sticks
Total per invitation: $0.30 (includes everything but envelopes)
1. To start open your envelope and make a template. This took a couple tries. I used plain computer paper and held everything up to our sliding glass door so I could easily trace the "lick lines" (I'm not so sure that is the technical term for the adhesive bonding on envelopes but that's what I always called it).
2. Create a thicker template from your computer paper draft. I used one of those three tab folders that I had lying around.
3. Trace your template onto the liner paper. I used 12x12 pieces of scrap booking paper and was able to fit three tracings onto each page. My envelopes were 8.75 x 5.75 and came with a BRIDES invitation suite from Michaels.
6. Use bone folder to crease paper. This was somewhat tricky because the paper did not want to fold at the envelope's crease but with a little finesse I was able to crease all the liners.
7. Enjoy all your hard work!!
Time: It took me about one full day to do 120 envelopes including tracing, cutting, and gluing.
Difficulty level: Easy
Cost: Envelopes (part of invitation suite)- Free
Liner paper- $0.59 per page x 40 = $23.60
Bone folder (already had)- $10
Scotch Wrinkle-Free Glue Stick- ~$3.00 for 2 sticks
Total per invitation: $0.30 (includes everything but envelopes)
Thursday, August 6, 2009
Invitation Update
Mr. Riley and I got to talking a while ago and decided the menus at every plate was going to be overkill. The meal is plated with a duel entree served so there are no options for guests to choose but we still wanted everyone to see what they were eating. We decided to return our original invitations from Target just because they didn't match the rest of the stationary suite and use what we originally intended to use as menus as our new invitation option. We also saved a little money, which is always good! :)
Sunday, July 19, 2009
Wedding Stationary
I just wanted to share with everyone some of the great buys I purchased at Michael's over the weekend. I will repost with mock-ups once we get closer to the big day but I couldn't help sharing all the great damask products out there.

These placecards are a little hard to see but they are white with a little damask border along the left side. These are also DIY from Michael's and cost only $6.99 for 40 count. I think we will add a green bow along the crease of these placecards to jazz them up a little.
These will be the wedding programs. They are simply a black cardstock with layers of white cardstock and finished off with a little bow. They come with white bows but I think we will use our green ribbon to tie in that aspect of our color scheme. These programs came in at $39.99 for 40 count as well.

These were originally supposed to be invitations but we will be using these DIY invitations as our menus at the reception. These were $39.99 for 40 count. This is a little pricey but Michael's always has coupons.
These placecards are a little hard to see but they are white with a little damask border along the left side. These are also DIY from Michael's and cost only $6.99 for 40 count. I think we will add a green bow along the crease of these placecards to jazz them up a little.
These will be the wedding programs. They are simply a black cardstock with layers of white cardstock and finished off with a little bow. They come with white bows but I think we will use our green ribbon to tie in that aspect of our color scheme. These programs came in at $39.99 for 40 count as well.Saturday, July 18, 2009
Wedding Invitations

The damask wedding invitation kit is from Target. It was $24.99 for 50 count DIY Invitations, Lined Envelopes, Response Cards, Coordinating Envelopes, and Seals. I did not realize that the Response Cards included with the kit were fold-over and they were rather large just to include response card information. I am repurposing those cards to include reception, hotel accomodation, and transporation information.
I then picked up some black and white all-purpose cards made by BRIDES from Michael's. They were $14.99 for 40 count and I will use them for response cards. Viola! A complete wedding invitation set for around $0.87 a person.
'
**UPDATE** Although I loved this invitation set, once I bought all the other stationary from the BRIDES collection these just seemed out of place. The BRIDES Collection paper was a slightly different shade of white and was textured while the Target paper was not. We decided to return these and use the BRIDES invitation set that we were going to repurpose as menus as the actual invitations. We will now print a few menus on cardstock and frame them. These will be arranged on the place card table and on the bars.
Subscribe to:
Posts (Atom)