Thursday, January 21, 2010

LuLu Belle

Let the photo shoot begin....


Rockin' the Mohawk


"I will get you for this"


Oh, that feels goooooddd


Cheese


What a rough day. I played, I ate, and I ate some more.


What? I'm not doing ANYTHING!


This look will melt your heart .025 seconds

Saturday, January 16, 2010

Glue Review (and Tape)

I don't know about you, but I think I have purchased at least five or six different types of glue for projects only to find out they didn't do what I needed them to do... well besides stick. I bet you are asking well what else are they supposed to do but please continue reading.

1. First up, hot glue. It is the staple in every girl's craft box.


Pros:
-Works well on most surfaces including wood, plastic, metal, etc.
-Allows for some "wiggle" room, meaning there is some time to reposition the items gluing before glue sets.
-Inexpensive


Cons:
-Stringy
-Hot, I always burn myself
-Doesn't work well on paper

All in all, hot glue is a great and affordable tool for most projects except for paper but can be messy and should be used with caution (to avoid those burns).


2. Next, Scotch Double Stick Tape.


Pros-
-Easy to use
-Sticks well
-Works great on paper
-Clean compared to other products reviewed


Cons-
-Expensive, especially if doing a big project
-Not much wiggle room


Double stick tape is great for smaller projects but is very expensive for larger projects. I used 1 roll of tape per 30-40 envelope liners and with each roll priced upwards of $2 it adds up.

3. Elmer's School Glue Sticks
Pros:
-Purple color allows you to easily see where applied
-Allows plenty of wiggle room
-Affordable

Cons:
-Creates lumpy, wrinkled look on paper especially if applied heavily.
-Slightly messy

Elmer's School Glue Stick should probably be reserved for children's crafts. It is easy to use but the finish product end up looking messy and juvenile.

4. Scotch Wrinkle-Free Glue Stick

Pros:
-Affordable
-Allows wiggle room
-Photo safe
-Dries without wrinkles, lumps, or bumps

Cons:
-Can be hard to find
-Hard to see where applying
-Sometimes requires second coat for long lasting stick

I found this method to be easiest to use for paper projects and was able to find it consistently in the scrapbooking area of Target.

5. Ad Tech Dot Glue Runner

Pros:
-Clean to use
-Affordable
-Repositionable
-Great sticking ability

Cons:
-Harder to use

Maybe it's just me, but I find it hard to make a straight line with this thing but the sticking power was awesome.

Friday, January 15, 2010

DIY Invitations Part I: Envelope Liners

Our store bought invitation kits needed a little personalization before they were sent out. The all white envelopes that accompanied the kit were, how do you say, blah. They were boring, white, sterile, etc. and we wanted them to feel elegant, graphic, bold, fun, and a touch preppy. After searching the internet, crafting stores, and not so crafting stores high and low for the perfect paper I crumpled into a tantrum in the middle of HobbyLobby. My lovely finance casually suggested, "What about these?" (*hands paper to me*) and I was sold.

1. To start open your envelope and make a template. This took a couple tries. I used plain computer paper and held everything up to our sliding glass door so I could easily trace the "lick lines" (I'm not so sure that is the technical term for the adhesive bonding on envelopes but that's what I always called it).

2. Create a thicker template from your computer paper draft. I used one of those three tab folders that I had lying around.

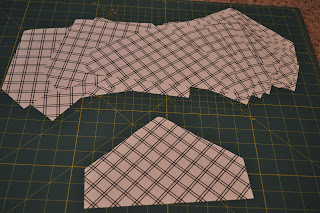
3. Trace your template onto the liner paper. I used 12x12 pieces of scrap booking paper and was able to fit three tracings onto each page. My envelopes were 8.75 x 5.75 and came with a BRIDES invitation suite from Michaels.
4. Cut out liners using scissors. Although you could probably use a paper cutter for some of the cuts the majority of this pattern needed to be cut by hand.


5. Use adhesive to attach liners to envelopes. I tried all different adhesives including: Scotch Double Stick tape, hot glue, Scotch Wrinkle-Free Glue Stick, Elmer's School Glue Stick, and Ad tech Dot Glue Runner. Stay tuned for my adhesive review in a later post but the Scotch Wrinkle-Free Glue Stick worked the best for this project.

6. Use bone folder to crease paper. This was somewhat tricky because the paper did not want to fold at the envelope's crease but with a little finesse I was able to crease all the liners.

7. Enjoy all your hard work!!


Time: It took me about one full day to do 120 envelopes including tracing, cutting, and gluing.
Difficulty level: Easy
Cost: Envelopes (part of invitation suite)- Free
Liner paper- $0.59 per page x 40 = $23.60
Bone folder (already had)- $10
Scotch Wrinkle-Free Glue Stick- ~$3.00 for 2 sticks

Total per invitation: $0.30 (includes everything but envelopes)

Monday, January 11, 2010

Flower Girl Inspirations


When I first started looking for flowergirl dresses I FELL HARD for this dress by Beane&Company:

(Source for above pictures)

I mean, come on, it's perfect! But at $80 a dress they are quite pricey for two little growing girls. So I continued searching but obviously was comparing everything to these.

Option #1: Is this cute floor length number with pickups and a colored sash. They girls would wear a black sash instead of the purple.


(Source for above pictures)

Option #2: Is a short option and although I am not a huge fan of the neon organza sash it could easily be changed out.


Option #3: Is also a short option and not only has the black sash around the waist but also at the hem line. (Source)

Option #4: And finally this SUPER cute black number which perfectly matches the fabric of the bridesmaid's dress!


Regardless of the dress we choose we will probably have to make a few modifications with sashes or flowers. I have seen some really cute fabric flower ideas (thank you Martha!) that I would like to incorporate. Like this one:


How adorable would a smaller version of this be with a mixture of white, black, green, and damask flowers in varying fabrics such as cotton, satin, tulle, etc?!?


Or this one which could be very adorable in our damask fabric:


How cute will these dresses look with ballet flats (a la Suri Holmes)?

So what is your favorite option for the flower girl dresses? Is the fabric flower covered sash too much?

Saturday, January 9, 2010

New Apartment (7 photos), by Brooke Brehm


Here are a few views of the new apartment... we are still working to get the rest in a "presentable" state. When we do we will be sure to post more pictures!

Click here to view photos

Wednesday, January 6, 2010

Hors d'oeuvres, Salads, and Entrées, OH MY!

After a long day of wedding related errands me, my mom, and FMIL met my father at the reception site for the much anticipated, at least on my part, taste testing!!
We met with the wonderful Director of Operations and the Director of Catering at the Jepson and sat down to taste a multitude of options of the reception. We already knew that we wanted a cocktail hour with hors d'oeuvres (because we need to take pictures), a served dinner (because we have 170 guests) , an open bar with all the accoutrements (well, because we enjoy a cold beverage), but we needed to keep it under $70/person (because we have a budget). We ended up going with the Deluxe Package the Jepson offered which included three different stationary hors d'oeuvres: a fruit, cheese, and cracker display; a roasted veggie display with a variety of dipping sauces; and a hot artichoke dip with an assortment of breads, a dual entree, and variety of sides.

First we started with the salads...
Left: A Radicchio Salad with Julienned Vegetables and a Creamy Tomato Dressing all served in a Boston Bibb bowl
Right: Baby Lettuces with Fresh Herbs, a Champagne Vinagrette, served in Parmesan Crisp bowl.

As you can see I loved the parmesan bowl salad, it was light and crispy and the dressing provided just the right amount of kick without being overly taste specific.

Next were the entrees and sides...

Left: Breast of Chicken Stuffed with Jumbo Shrimp and Spinach topped with a White Wine and Butter Reduction, Julienned Vegetables, and Jasmine Rice Pilaf.
Right: Another sample of the Parmesan Bowl Salad

Center: Lump Crab Cake with Roasted Red Pepper Mayonnaise, Medley of Zuchinni and Peppers, Herb Roasted Turned Potatoes (they're hidden under the filet), and Sauteed Filet of Beed with Bourdelaise Sauce.

Center: Filet of Sea Bass topped with a White Wine and Butter Reduction, Mashed Garlic Infused Potatoes, and Asparagus Bundle.
We decided to go with the Sea Bass and the Filet of Beef for the dual entrees, the Garlic Infused Mashed Potatoes, and the Julienned Veggies for our dinner. MMmmm, good. The decisions were difficult because everyone else felt we should go with the Sea Bass while I was leaning more towards the chicken #1 because I felt it was a more universal appealing dish and #2 I love red fish not white fish, and the Sea Bass just wasn't doing it for me. We eventually went with the Sea Bass, which my mother (who hates all things not steak LOVED) and I am comfortable with that decision (although I get Salmon on my plate... haha VICTORY!). All in all I think we picked the dishes that we enjoyed but will tasty to the masses. The Jepson team was also extremely accomodating in developing an alternate menu for our vegetarian guests and additional dishes for my sister who has Celiac Disease. Yum, yum, yum...

No, I did not fall off the face of the Earth...


... I just moved to Kansas.


I apologize for the hiatus from posting. Life has been a whirlwind lately. In the past 2-3 months: Ryan has returned from Iraq, he moved into our apartment, he got to come to VA a few times, Thanksgiving happened, I quit my job, VA was hit with a blizzard, we celebrated Christmas, I packed up, and we moved halfway across the country to KANSAS! We are exhausted from all the traveling and hauling of possessions (see picture below) but are so happy to finally be together.

Liberty Belle's energy level pretty much speaks for all of us.
(Source: Me)

We have gotten a few more wedding day projects completed since I last posted which I am working on writing up for you all. We got an AMAZING new camera from Ryan's parent's for Christmas which is even more motivation for posting all of our activities. My parent's gave us a much needed and tricked out printer so I can get moving on all the DIY paper projects I have planned (Invitations, Programs, Menus, and other signage). So stay tuned and I'll meet you back here!