I know posting has been sparse lately but it is because I have been working on creating a photo album for our parents. Whew, I know why photographers charge so much for those puppies... they are A LOT of work! Here is what I came up with:
Would you change anything? If so, what, and should I move it, delete it, add it?
Friday, August 20, 2010
Tuesday, August 17, 2010
Cruisin' in the Fast Lane: Practice Makes Perfect!
The day before our rehearsal my mom and sister came home from a shopping extravaganza with some new snazzy dresses to wear to the rehearsal. They pulled them out to show me and they were almost IDENTICAL to the dress I was planning to wear. Cue panicked drama!
This is the dress I was going to wear. Fear not though. I've owned the dress for forever and have worn it a multitude of times pre and post wedding.
So, of couse I had to go shopping. Duh. Ryan and I spent the morning running errands and then frantically hit up the mall to find a stand in. I finally found the perfect yellow dress to wear only to spill make-up on it as I was walking out the door. Doh! So I ended up in another dress that I brought from Kansas. Drama. Drama. Drama.
We arrived at the church a little early to preview everyone's outfits for the wedding since we hadn't seen most of our bridal party in 6 months to a year.
The rehearsal was like most we processed, recessed, processed, recessed, processed, and recessed one more time for good measure. Once we had sufficiently walked over five miles we headed down the street for a little dinner.

We arrived to a beautifully decorated restaurant (thanks to MIL) and sat down to eat some grub.


This is the dress I was going to wear. Fear not though. I've owned the dress for forever and have worn it a multitude of times pre and post wedding.
 |
| Source |
 |
| Source |
We arrived at the church a little early to preview everyone's outfits for the wedding since we hadn't seen most of our bridal party in 6 months to a year.
 |
| Some Walking |
 |
| Tired Bridesmaids |

We arrived to a beautifully decorated restaurant (thanks to MIL) and sat down to eat some grub.


And finally we opened some gifts!


Photos courtesy of Bridesmaids Aida and Lynsey!
Sunday, August 15, 2010
When it Rains it Pours
Ummm... seriously the past five days have been the pits! Since my last post our new dog ate my wedding dress, I found a lost baby and proceeded to get attitude from it's "egg donor" (she doesn't deserve to be called a mother), my husband left for a three week training session during which we will have little no communication, and our car was side-swiped during a freak storm! WTH.
I'm over the dress. He's a dog and didn't know what he was destroying. I won't be repairing it because I had intended all along to get the dress made into a Baptismal/Christening gown for our future children and I know that is still possible using the undamaged parts. In case you're curious though here is the grizzy damage...


The other day we went to my husband's work's family day. There were a couple hundred soldiers, their significant others, children, dogs, etc milling about a park for an afternoon BBQ. As the day is wrapping up a little boy, had to have been less than two, came over and started petting my dogs. I noticed there was no one watching him so I kept an eye on him as he continued to mill about unsupervised. He found several other dogs to play with and even climbed into a couple's stroller and hung out while they were preoccupied. Finally, they announced the end of the event and the hoards of people began beelining it to leave. I immediately scanned the crowed for the little boy to see if he had been claimed. Of course, he hadn't. I was honestly worried that someone would run him over with their car so I scooped him up and began walking him around the crowd. After about ten minutes I was completely fed up and began asking any and everyone if they knew who's kid it was. I held him up above my head and walked the area several more times. About fifteen minutes into this furious search for the kid's parents this woman calmly walks over and says, "Uh, he's mine". The tone of her voice implied that I should not have my hands on her kid. I tried to play it off by speaking to the child and saying cheerfully, "WE FOUND HER!" and high-fived him. She made a disgusted gutterel noise, turned on her heel, and walked away. WTF. No panicked but joyous reunion. No excuses and explanations. Not even a f*ing thank you. Ugghh some people shouldn't have children.
and our car....

I'm over the dress. He's a dog and didn't know what he was destroying. I won't be repairing it because I had intended all along to get the dress made into a Baptismal/Christening gown for our future children and I know that is still possible using the undamaged parts. In case you're curious though here is the grizzy damage...


and our car....

Wednesday, August 11, 2010
Cruisin' in the Fast Lane: It's Sew You!
We really wanted to get our bridal party gifts that they could a) use again, b) genuinely liked, and c) were meaningful. After brainstorming for a little while I decided I really wanted to get our flower girls American Girl dolls that looked like them.
So cute! I picked the hair color... blonde, the eye color.... blue, the hair style.... short, and clicked on the final result.......scccrreeeeaaaaccchhh. The dolls were $95 each. Not including any clothes, accessories, anything. $95 for a naked doll. Yeah, that's not happening.
And the search for the perfect doll commenced... I wanted it to be similar to the American Girl Doll but not a cheap knock-off. Our criteria included 15-18" tall, soft body and hard limbs, good hair that came in blonde, cute face, and cost under $40. After hours upon hours of looking Ryan and I finally agreed upon this sassy little girl:
Although the baby doll was cute and I was sure our flower girls would love her I wanted to make her even more special. I decided to make the dolls dresses that looked like the flower girl dresses.
I started the dress making adventure by purchasing a Simplicity 18" Doll Dress Making Pattern (I used a modified version of the bottom left dress). I traced the pattern on some white silk and white lining I had purchased according to the pattern instructions. I then cut these pattern pieces out.
I had to cut a new pattern three times because the dolls we purchased were fuller than the 18" dolls the patterns were made for. I then began to painstakingly sew the lining to the satin, the back to the front, and the skirt to the top.
I also created bows with some leftover ribbon from my pomander project. I then added a sweater to cover the dolls half cloth/half plastic arms and a ribbon around the waist to complete the look.
 |
| My American Girl |
And the search for the perfect doll commenced... I wanted it to be similar to the American Girl Doll but not a cheap knock-off. Our criteria included 15-18" tall, soft body and hard limbs, good hair that came in blonde, cute face, and cost under $40. After hours upon hours of looking Ryan and I finally agreed upon this sassy little girl:
 |
| Molly P. Originals |
 |
| Flower Girl D modeling her dress |
 |
| Pattern pieces cut |
 |
| Dress |
 |
| The finished project |
I was soooo pleased with how the dresses turned out and the girls loved their presents. One slept with hers and then carried it around the entire wedding. When I asked the other if she would like to take it out of the box she said, "No, I think this is a really special gift and that I should probably leave it in the box to keep it nice". She's five, people. Too cute.
For about $60 each of the girls not only got their dolls with the matching flower girl outfits, they got the autumn outfit the dolls came in, and mini monogrammed tote bags full of goodies like coloring books, crayons, and mini etch-a-sketches to occupy their time during the boring wedding events.
Saturday, August 7, 2010
Cruisin' in the Fast Lane: Strike a Pose!
Our photobooth in action...

The photobooth was a HUGE hit with all of our guests especially the younger ones! We both thought it turned out great but there are a few things we could have done better...
1) Get another battery and have it charged. Our battery ran out about halfway causing us to have to close down and charge the battery up putting a HUGE dent in the photobooth momentum.
2) Get someone to take pictures. We used a remote and believe people mistakenly held down the button too long so we ended up with every other "picture" being a video. This also contributed significantly to the battery suck. This will also prevent people from moving the tripod or taking your camera off the tripod (yep, that happened).
3) Go to the photobooth. Neither my husband nor I set foot anywhere near our photobooth. Big tear. :(
3) Go to the photobooth. Neither my husband nor I set foot anywhere near our photobooth. Big tear. :(
Cruisin' in the Fast Lane: Accessorizing the Photobooth
Ryan and I wanted wanted our photobooth to be kickass so we did our best to gather up some fun and playful accessories. We bought a chalkboard, an empty picture frame, some vintage hats, a parasol, and we made some mustaches.

To make these bad boys I bought some crafting fur at Hobby Lobby for $2.99. One piece was enough to create 2 of each design.
I then used a mustache template that I found here and traced the mustaches onto the back of the fur and onto brown felt using a sharpie. I then cut out the templates, sandwiched a dowel rod in between the piece of felt and mustache, and secured with hot glue. Finally I touched up the mustaches by trimming them up with facial hair scissors.


To make these bad boys I bought some crafting fur at Hobby Lobby for $2.99. One piece was enough to create 2 of each design.
 |
[Source: Hobby Lobby] |


Wednesday, August 4, 2010
Ruth + Jerry = Most Adorable Wedding Ever.
So while perusing my favorite haunts this morning I came across a wedding over on Southern Weddings that I just had to share. This is by far one of the most beautiful and joyful weddings I have seen in my years of wedding blog stalking.
The couple, both in their 80s, wanted a small intimate affair and were married at 2pm on a Tuesday with only a couple of people in attendance. The bride's grandson, also the photographer, Andy Donnan of Donnan Photo, was there to capture it all.


The couple, both in their 80s, wanted a small intimate affair and were married at 2pm on a Tuesday with only a couple of people in attendance. The bride's grandson, also the photographer, Andy Donnan of Donnan Photo, was there to capture it all.


Tuesday, August 3, 2010
AH-MAZ-ING wedding videos.
I'm so jealous of these wedding videos. It seriously makes me regret not hiring a videographer.
Lauren + JP from Matt Odom on Vimeo.
If you want to learn more about Lauren, the bride, check her out as Mrs. Scissors on Weddingbee or at her blog I love you much.
Time Of The Season from Dustin Blake on Vimeo.
Or if you want to check out more info on Leilani, the bride, you can also find her on Weddingbee as Mrs. Labrador Retriever.
Cruisin' in the Fast Lane: VA is for Lovers
In the few short days leading up to the wedding we also got work on our OOT boxes! I put the whole family to work on this one as we had to make 30+ boxes to be delivered. I was a terrible blogger the week before the wedding. This was mainly due to the fact I was running around like a mad woman, passing out, or trying not to pass out therefore I got ZERO pictures of the creation of or the final product of our boxes. :(
The "theme" for our OOT bags was VA is for Lovers because the vast majority of our guests were not from the state we tried to put together a little box of things VA is known for and especially things we really loved.
Here is what we included:
VA is for Lovers Bumper Sticker: We got these for free from here. They came in packs of 100 so we put one for each person in the OOT boxes.
Fredericksburg Tourism Information: My mom was so kind to raid to the local visitor center for free information packets related to Fredericksburg VA. She even made friends with the lady who ran the center who in turn ordered us even more information especially for our guests. We got maps of the area, restaurant guides, information on other events happening that weekend like the Renaissance Fair, etc. You can also downloading lots of guides and tour information from visitfred.com.
Route 11 Potato Chips:
Route 11 is highway that both Ryan and I grew up near. The original chip factory was about 10 minutes from the house I lived in as a small child and the chips are BANGING so we knew we had to incorporate them. We gave each guest a bag of chips and tried to vary the flavors in the box. We ordered the 2oz. snack bag combo case which included a sampling of their Lightly Salted, Barbeque, Dill Pickle, Sour Cream and Onion, Chesapeake Crab, Salt and Vinegar, Sweet Potato, and Mama Zuma's Revenge Habanero flavors. They also carry Garlic and Herb, Mixed Vegetable, Yukon Gold, Mama Zuma's Revenge Green Chile Enchillada, and Hayman flavors. YUMMMOOO!
Virginia Peanuts: Since VA is known for their peanuts we through in a few individual packages of the appropriately named Hubbies by Hubbard Peanut Company.
WELCOME BOOKLET: We wanted to welcome our guests so we wrote a short note to them on the front of the booklet. Inside we gave them all the important information concerning the wedding including addresses, times, etc.
VA Postcards:
Each OOT Box also got a Greetings from Virginia Postcard from Zazzle.
We grabbed some 8oz bottled waters and stuck those in as well.
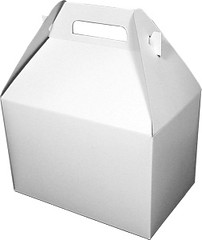
We packaged everything in 9x6x6 white gable boxes from here.
To decorate the boxed we wrapped 2" wide black ribbon from handle hole to handle hole, hot gluing the ends about 1" down the inside of the box. We then used double sided tape to cover one side panel with a half sheet of paper we had specially printed at FedEx/Kinkos.

In the end they looked similar to these boxes on WeddingBee.
Are you doing OOT boxes? What did you include?
The "theme" for our OOT bags was VA is for Lovers because the vast majority of our guests were not from the state we tried to put together a little box of things VA is known for and especially things we really loved.
Here is what we included:
VA is for Lovers Bumper Sticker: We got these for free from here. They came in packs of 100 so we put one for each person in the OOT boxes.
 |
| [Source: Wish Special Events] |
 |
| [Source: Virginia] |
Route 11 is highway that both Ryan and I grew up near. The original chip factory was about 10 minutes from the house I lived in as a small child and the chips are BANGING so we knew we had to incorporate them. We gave each guest a bag of chips and tried to vary the flavors in the box. We ordered the 2oz. snack bag combo case which included a sampling of their Lightly Salted, Barbeque, Dill Pickle, Sour Cream and Onion, Chesapeake Crab, Salt and Vinegar, Sweet Potato, and Mama Zuma's Revenge Habanero flavors. They also carry Garlic and Herb, Mixed Vegetable, Yukon Gold, Mama Zuma's Revenge Green Chile Enchillada, and Hayman flavors. YUMMMOOO!
 |
| [Source: Route 11 Potato Chips] |
 |
| [Source: Hubbard Peanut Company] |
 |
| [From L,R Top, Bottom: Back Panel, Front Panel, Inside Right Panel, Inside Left Panel] |
Each OOT Box also got a Greetings from Virginia Postcard from Zazzle.
 |
| [Source: Zazzle] |
We packaged everything in 9x6x6 white gable boxes from here.
 |
| [Source: Mr Take Out Bags] |

In the end they looked similar to these boxes on WeddingBee.
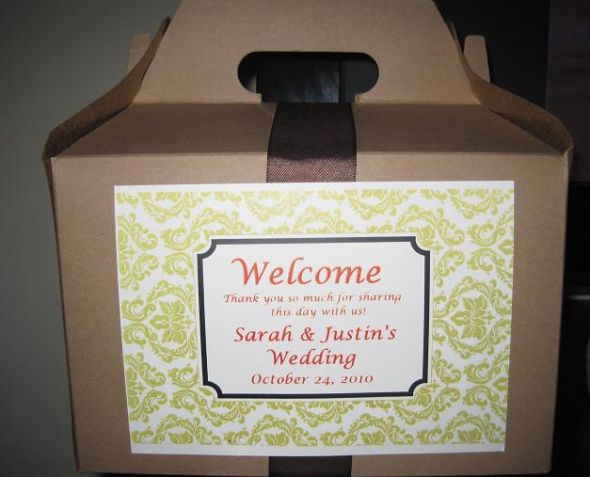 |
| [Source: Habibah14 via Wedding Bee] |
Monday, August 2, 2010
Cruisin' in the Fast Lane: Construction Zone
Early on Ryan and I decided we would like to do a "faux"to booth at our wedding. If you never heard of this increasingly popular wedding event, it involves setting up a background, providing some props, and either using a photographer or camera/tripod/remote system to allow guest to take funny snap-shots.
 |
| [Source: You Look Nice Today via Ruffled] |
 |
| [Source: Lena Corwin's Wedding via Green Wedding Shoes] |
'FAUX'to Booth Tutorial
To make our own photobooth we modified a DIY Greenscreen Tutorial to fit our needs. First we needed to purchase our materials:
•3/4"x10' Sch. 40 PVC Pipe- 4
•3/4" Sch. 40 PVC 90 Degree Elbow- 2
•3/4" Sch. 40 PVC T-Connector- 2
•3/4" Sch. 40 PVC Cap- 8
•3/4" Sch. 40 PVC Coupling- 2
•3/4" Sch. 40 PVC Cross Connector- 2
Total cost for all of these materials should be less than $25. You will also need a PVC pipe cutter or hacksaw, which thankfully my dad had.
To assemble:
- Cut 2 pieces of 3/4" PVC pipe into approximately 24" lengths. Put a cap on one end of each section.
- Slide a T-Connector onto each 24" length.
- Cut 8 pieces of 3/4" PVC pipe into approximately 18" lengths putting a cap of one end of each section.
- Stick the open ends of each pipe into a cross connector using 18" lengths for three of the holes and a 24" length with T-Connector into the fourth hole.
 |
[Source: DIY Greenscreens] |
 |
| [Source: DIY Greenscreens] |
- These pieces will be inserted vertically into the top of the T-Connector.
- Cut the length of your crossbar to width of your fabric plus about 5 inches.- Attach the 90 degree elbow connectors to the ends of the crossbars and to the top of the vertical pipes.
- Secure your fabric to the top of the pipe using clamps, velcro, tape, pins, etc.
ATTENTION: This frame is not meant to be a permanent structure and is wobbly. Be sure to reenforce joints with heavy duty tape, such as duct tape, if you are worried about the durability.
We purchased 10 yards of Premier Prints Kimono fabric in Chartreuse/White from Fabric.com and had WAY TOO MUCH. We joke that we'll be making play clothes for our children, grandchildren, and great children like Julie Andrews in The Sound of Music.
 |
[Source: Fabric.com] |
 |
| [Groomsmen] |
Subscribe to:
Posts (Atom)

